This article includes-
- Preparing Printer for Printing Setup Configuration,
-
Preparing the iPAD for configuration( Creating Apple ID Account)
-
Configuring iPad with the printer after iPAD setup is already done (apple id created)
-
Configure the printer on the Easy Eat partner app
Preparing Printer for Printing Setup Configuration
When you unbox the printer, you will find three objects in the printer box as shown in the image below

Item no 1: Power adapter and power cable.
Item no 2: USB Cable
Item no 3: Printer
STEPS FOR PREPARING PRINTER
Step 1: Connect the power cable ( item no 1) to the printer

Step 1.1: Connect the power cable to the power source on the other side

Note: You will see a green light on the power adopter. If the green bulb is not lighting then check the connection with the power source again.

Step 2: Open the case so that you can insert the paper roll into the printer. To open the case, you need to press the first button (calling button 1 for future reference) as shown in the image.

You will be able to open the top flap after pressing the button shown in the image above. It will look like as shown in the image below

Step 3: Now insert the roll in such a way that the paper is coming out from below the roll and not from the top of it.


The roll will look like as shown below after you put it in the printer

Step 4: Close the flap after keeping the roll and make sure you keep some of the paper outside.

Step 5: Now you need to do the test print to ensure that the printer is printing correctly. In order to do it, first press the second button on the top, and while keeping the button pressed, switch on the printer. Please check the position of both buttons
The second button on top (Calling button 2 for future reference)

Power button (Calling button 3 for future reference)

Step 6: Press button 2 and while keeping it pressed, switch on button 3. It will look like below

Keep button 2 pressed and you will find that two lights i.e. the one labeled as “Error” and “Paper” will start blinking. Refer to the two red color lights below. Keep button 2 pressed even when the lights start blinking. You will see that the printer has printed one test print after a few moments.

The printed self-test receipt will look as shown below

Step 7: Keep a note of the highlighted values in this receipt, these will be used later on. Here are these highlighted values below. One says AP key and the value highlighted is “012345678” and another one is AP IPADDR and the value printed here is 10.10.100.254

Let us keep the printer aside because we need to prepare the iPad as well so that we can configure it.
Preparing the iPAD for configuration( Creating Apple ID Account)
If you are using an old iPad on which Apple ID is already created, you can skip this section
When you unbox the iPad, you will find there are three items in the box as shown below

Item no 2 is the power adapter,
Item no 3 is the power cable.
STEPS-
Step 1: Switch on the iPad by long pressing the power button on the iPad. IPad will start up as shown below.

After starting up, it will prompt you to connect to wifi, you can connect it with the restaurant wifi. Make sure your wifi speed is good i.e. more than 15 Mbps and avoid using hotspots. Also, connect to a 2.4g network and not a 5g
Note: We have observed in restaurants when wifi SSID has any special characters in its name, it causes issues with the connection. So try to avoid any special characters in the wifi connection name in the restaurant. If it is there, the restaurant can go to their wifi account and change it.
Step 2: Enter your wifi id and password.


A few moments later, it will initiate the iPad setup and ask you to choose basic settings like language, etc.

Step 3: After that, if you try to install any app ( like the Easyeat partner app, it will ask you to set up the Apple ID first. Click on Create a new Apple ID.


Kindly note that in order to create a new Apple ID, an email account is required. Easyeat POC will create a Gmail account for receiving the OTP related to Apple ID. However, we will use the restaurant owner’s number only for OTP purposes.
Step 4: Enter the email address created for the restaurant for creating the new Apple ID. You can keep the password the same as the one created for the email id. Email id and apple id password can be the same.
Make sure you agree to the terms and conditions and click next.

Step 5: Select the details as shown below while clicking next (The first name should be the restaurant name and the Surname is the location of the restaurant. Also, put the date of birth as any date before 1990.


Step 6: In Payment Method, you can select none.

Step 7: The address field is mandatory, you can put the restaurant address in that section.

Step 8: Next will be the phone number, make sure to put the restaurant owner’s number in this section, they will receive an OTP on this number. Tick “Verify using text message”.

Step 9: Enter the verification code received on your phone

Step 10: Next will be the verification of the email address. You will receive an email with a password

Step 11: Enter the code received on the email address which was created for apple id registration

Step 12: You will be signed in to iCloud and your Apple ID registration is complete now.

Now the iPad is ready for configuration with the printer.
Let us go to the next steps in the configuration.
Configuring iPad with the printer after iPAD setup is already done (apple id created)
iPad is already connected to the restaurant's wifi with good speed and connected to 2.4g connection (not 5g)
Note: We have observed in restaurants when wifi SSID has any special characters in its name, it causes issues with the connection. So try to avoid any special characters in the wifi connection name in the restaurant. If it is there, restaurants can go to their wifi account and change it. (in our case wifi name is Restaurant wifi and it does not have any special character, so we are fine there).
Step 1: Go to the iPad settings in wifi section and click on the i label as shown below

Step 2: Now note down the ipv4 wifi settings (values against subnet mask and router), we will use them later

Step 3: The printer is already ready for configuration as per the instructions from Section 1. Since the printer we are setting up is a wifi printer, it will create its own wifi as well and we will use that to connect the printer and iPad. In order to do this, disconnect the iPad with the restaurant wifi and connect it to the printer wifi as shown in the image below

Step 4: Take the password from the test print slip which was printed when we were setting up the printer for configuration in section 1 (Step 7 in section 1). Note the value “012345678”, this is the password of the wifi printer).
Step 5: Take the values written in the AP IADDR section. Open Safari Browser in the iPAAD and enter the value (10.10.100.254) in the browser.

After entering 10.10.100.254 in the Safari browser, you will be asked to enter the login details as shown in the image below

Step 6: Both ID and password values are admin, please enter admin as username and admin as password.

Step 7: After entering the login details, you will see the following screen as shown below. Go to STA settings in the window given.

Step 8: Go to STA settings and click on Scan

Note: Here, we are basically trying to access the printer ip settings so that we can configure the restaurant wifi settings and link them.
Step 9: When you click on scan, it will search for all the available wifi... select the same restaurant wifi for which you checked the ipv4 setting before in steps 1 & 2 of section 3. When you select the restaurant wifi and click on OK, it will pop up a message and say that password is empty as shown in the screenshot below.

Step 10: After you close it, then it will pop up another screen where you can enter the restaurant's wifi password.

Step 11: Enter the restaurant wifi password (Don’t copy the password from this image and take the actual password you have set)

Step 12: Change the setting in "obtain an IP address automatically" to disable and you will need to manually enter the details in all 4 text boxes i.e.
- IP Address: Take the IP address value from the restaurant's wifi IPv4 setting. Put the value written against the router (Section 3 Step 2 also refers to the image below), however, keep in mind to change the last digit to any number less than 254. The first three numbers will be the same as the wifi router value.
- Subnet Mask: take the subnet mask value exactly the same as this. This value you would have found in test print as well. In this case, this value is 255.255.255.0
- Gateway Address: GAteway address will be the same as the IP address but the last digit should be changed to 1. In this current case, this value will be 192.168.197.1
- DNS Server Address: For the DNS server address, leave it, don't touch it, if you happen to touch it, make it equal to AP IPADDR IN the test print.

In this case, while making this tutorial, the 4 values look like as shown below

Step 13: Now click on save and then click on restart. Here is how the corresponding screens look like


Step 14: Printer setup is done and the printer will print the following receipt at the end.

The printer setup is done. Now reconnect the iPad with the restaurant wifi again ( remember that in step 3 of this section, we connected the iPad with the wifi printer. Now is the time to reconnect it back to the restaurant wifi).
Configure the printer on the Easy Eat partner app
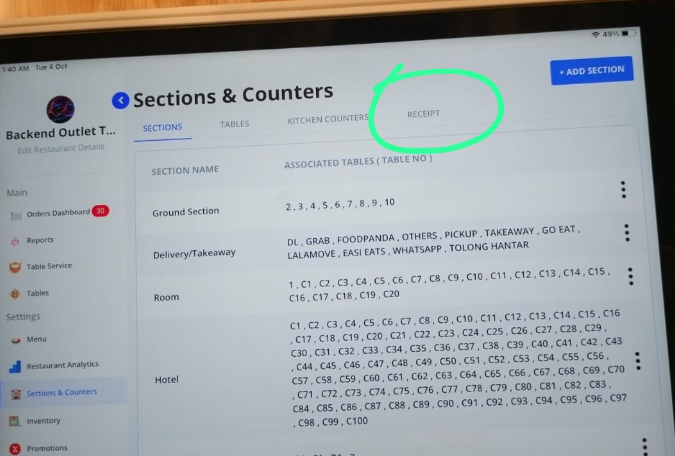
Step 1: Login in the partner app and go to the module on sections and counter

Step 2: After going into “the section and counter section we will map the printer with any counter of our choice. Let us connect with the receipt printer first. Click on receipt.
Step 3: It will ask for the name of the Printer
Take the IP address value which you entered in step 12 of section 3 and put it in the partner app in the printer name. In this case, the value is 192.168.197.250. You need to add :9100 as well after the IP. So the final value to be entered is 192.168.197.250:9100
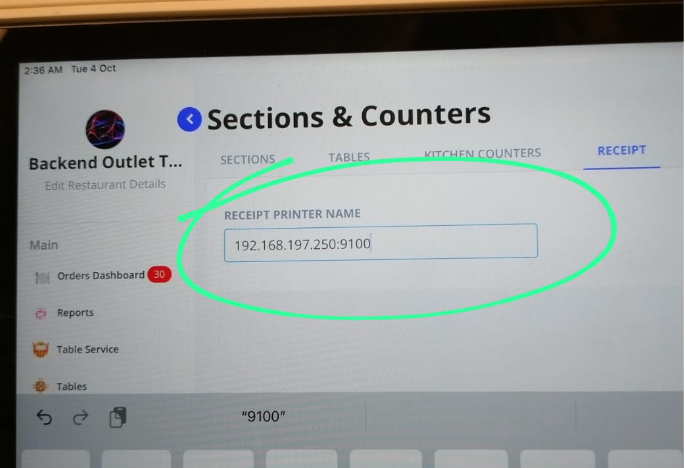
(Ref image to take the IP address value is below)
Step 4: Click on *update* after entering the value as guided above and this printer is saved as a receipt printer
Step 5: Now we can test if the printer is printing receipts correctly. For this go to any order created for testing purposes (can be actual live order as well) and click on print. It will print the receipt.